This Classic Pavlova is a light, airy, and elegant dessert that features a crisp meringue shell filled with whipped cream and fresh fruit. It’s a show-stopping dessert that’s surprisingly simple to make. With a delicate, melt-in-your-mouth texture and a slightly chewy center, this pavlova is perfect for holidays, celebrations, or any special occasion.
Full Recipe:
Ingredients
For the Meringue:
- 4 large egg whites (room temperature)
- ¼ teaspoon cream of tartar
- ¼ teaspoon salt
- 1 cup sugar (added gradually)
- 1 teaspoon lemon juice
- 1 teaspoon vanilla extract (optional)
- 2 teaspoons cornstarch
For the Whipped Cream & Toppings:
- 1 cup heavy whipping cream
- 2 tablespoons powdered sugar
- 1 teaspoon vanilla extract
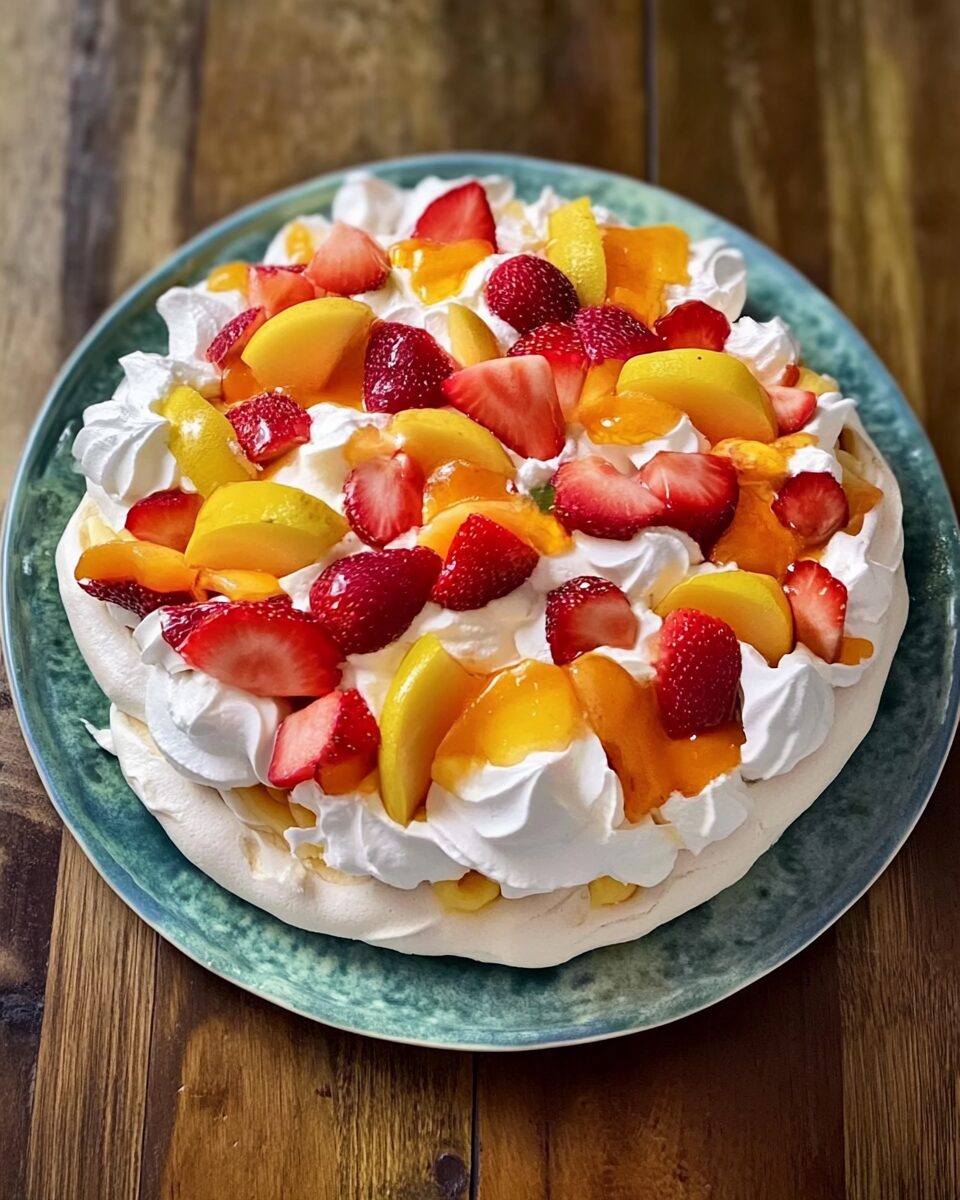
- 1 cup mixed fresh fruits (strawberries, mango, raspberries, kiwi, or blueberries)
- 1 tablespoon sugar (for macerating the fruit, optional)
Directions
Step 1: Prepare the Egg Whites & Baking Sheet
- Separate the egg whites and let them sit at room temperature for 30 minutes to ensure they whip properly.
- Preheat the oven to 250°F (120°C).
- Prepare a baking sheet: Place a 9-inch round cake pan on parchment paper and trace around it. Flip the paper over onto a baking sheet as a guide.
Step 2: Make the Meringue
- In a stand mixer with a whisk attachment, beat egg whites, cream of tartar, and salt on medium speed until soft peaks form.
- Gradually add sugar, one tablespoon at a time, while beating on high speed. Continue beating until stiff peaks form, about 18-20 minutes. The meringue should be glossy and smooth.
- Gently fold in lemon juice, vanilla extract (if using), and cornstarch.
Step 3: Shape & Bake the Meringue
- Spread the meringue onto the parchment paper, using the circle as a guide. Slightly build up the edges to create a bowl-like shape.
- Bake for 1½ hours without opening the oven.
- Turn off the oven and let the pavlova dry inside for 1 more hour with the oven door closed.
Step 4: Prepare the Whipped Cream & Fruit
- In a mixing bowl, beat the whipping cream, powdered sugar, and vanilla until soft peaks form.
- Macerate the fruit (optional): Mix the fresh fruit with 1 tablespoon sugar and let it sit for 20 minutes to release natural juices.
Step 5: Assemble & Serve
- Spread the whipped cream over the cooled meringue base.
- Spoon the macerated fruit on top.
- Serve immediately and enjoy!
Storage Tips
- Store unfilled pavlova in an airtight container at room temperature for up to 24 hours.
- Once assembled, it’s best enjoyed immediately to maintain the crisp texture.
Nutrients (Per Serving – Approximate)
- Calories: 230 kcal
- Carbohydrates: 35g
- Protein: 3g
- Fat: 10g
- Saturated Fat: 6g
- Fiber: 1g
- Sugar: 30g
- Sodium: 55mg
The Origins of Pavlova
The pavlova dessert is named after the Russian ballerina Anna Pavlova, who toured New Zealand and Australia in the 1920s. As the story goes, both countries claim the creation of this iconic dessert, with a version said to be created in her honor during her visit. The dessert is traditionally made by whipping egg whites with sugar to form a meringue, then baking it into a crisp shell with a slightly chewy center. Topped with whipped cream and fresh fruit, pavlova offers a harmonious blend of textures, making it an unforgettable treat.
A Light and Elegant Dessert
One of the most appealing aspects of pavlova is its light, airy nature. The meringue base is crispy on the outside, yet soft and marshmallow-like on the inside, creating a contrast in textures that melt in your mouth. The beauty of pavlova lies in its simplicity. The delicate meringue provides the perfect canvas for the rich and creamy whipped topping, while the fresh fruit offers a burst of natural sweetness and color.
The meringue’s subtle sweetness balances well with the tartness of the fruit, making pavlova a refreshing and indulgent dessert. It’s light enough to be enjoyed after a rich meal, and it adds a touch of sophistication to any table. Whether served at an intimate dinner or as the centerpiece of a festive celebration, pavlova is always a crowd-pleaser.
The Process of Making Meringue
Meringue, the base of pavlova, can be a bit tricky to perfect. The key is to whip the egg whites properly to achieve the right texture. When done correctly, the meringue becomes glossy and forms stiff peaks that hold their shape. A bit of cream of tartar and salt are used to stabilize the egg whites, ensuring they whip up beautifully and maintain their volume.
Once the egg whites are whipped, the sugar is gradually incorporated to achieve a smooth, glossy texture. The sugar needs to be added slowly to avoid deflating the egg whites. Additionally, cornstarch is folded in at the end to give the meringue its characteristic soft center. This step is important because it helps the meringue remain tender while keeping the outside crispy.
The meringue is shaped into a round disk or shallow bowl-like shape, which will form the base of the pavlova. Once baked, the meringue should be left to cool in the oven, allowing it to dry and crisp up perfectly.
The Importance of Whipped Cream and Fresh Fruit
The cream that tops the pavlova plays a crucial role in balancing out the meringue’s sweetness and adding a rich, velvety texture. Whipping heavy cream with a bit of powdered sugar and vanilla extract results in a smooth, light topping that complements the crispness of the meringue. It’s essential not to over-whip the cream, as this could turn it into butter. The goal is to achieve soft peaks that hold their shape but are still smooth and spreadable.
Fresh fruit is the final touch that brings the pavlova to life. Traditionally, a mix of berries such as strawberries, raspberries, and blueberries are used, but other fruits like kiwi, passionfruit, and mango can also be included to add different textures and flavors. The fruit not only enhances the visual appeal of the pavlova, but it also provides a fresh, slightly tangy contrast to the sweetness of the meringue and whipped cream.
In some variations, the fruit is macerated with a little sugar, which draws out the juices and intensifies the flavor. This step is optional, but it can make the fruit even more flavorful and juicy.
The Art of Assembling the Pavlova
Assembling the pavlova is a simple yet rewarding process. Once the meringue has cooled and firmed up, the whipped cream is spread generously on top, filling the center of the meringue. The fruit is then arranged in a visually appealing manner, creating a beautiful contrast of colors. You can arrange the fruit in a circular pattern or create a more freeform design—either way, the pavlova will look stunning when presented.
It’s important to serve the pavlova immediately after assembling to ensure the meringue retains its crisp texture. If left too long, the whipped cream can cause the meringue to soften. This dessert is best enjoyed fresh, but it can be made in advance by preparing the meringue and storing it in an airtight container for up to 24 hours. The whipped cream and fruit can be added just before serving.
Customizing the Pavlova
While the classic pavlova is delightful as is, there are many ways to customize it to suit different tastes. For example, if you prefer a dairy-free option, you can substitute the whipped cream with coconut cream or a non-dairy whipped topping. For a more indulgent version, consider adding a drizzle of caramel sauce or a sprinkle of toasted nuts like pistachios or almonds for extra crunch.
The fruit topping can also be customized to suit the season. In summer, try using berries, peaches, or nectarines, while in the fall, pomegranate seeds, figs, or pears would make a lovely addition. You can also experiment with different flavor profiles by adding a hint of citrus zest to the whipped cream or incorporating a flavored syrup to the meringue.
A Showstopper Dessert for Any Occasion
Pavlova is a dessert that always impresses, whether you’re serving it at a casual family gathering or a formal celebration. It’s an elegant choice for holidays like Easter or Christmas, as well as birthdays, anniversaries, or even casual dinners with friends. The beautiful presentation, combined with the light, refreshing flavors, makes it an ideal dessert to share and enjoy.
Despite its impressive look, pavlova is relatively easy to make. The key to a successful pavlova is patience—allowing the meringue to bake slowly and cool properly, ensuring the cream is whipped to the perfect consistency, and letting the assembled dessert chill for the best texture and flavor.
Conclusion
Classic pavlova is a light, airy dessert that offers a delicate balance of flavors and textures. With its crisp meringue shell, creamy whipped filling, and fresh fruit topping, it’s the perfect show-stopping dessert for any special occasion. Its elegant presentation, combined with the simple yet delicious taste, makes it a favorite among dessert lovers.
Whether you’re an experienced baker or a beginner, this recipe is easy to follow and sure to impress. By customizing the fruit and toppings, you can make this dessert your own, ensuring it suits your personal taste. Serve it at your next gathering, and you’ll have a dessert that not only tastes amazing but also looks stunning on the table.